Home Assistant: Send Telegram Notifications via Automations
Daniel Gehn • January 26, 2022
Last Updated: February 3, 2022
In this post
- 👋 Introduction
- ⚙️ Requirements
- 🤖 Setting up a Telegram bot
- 🔗 Setting up the Home Assistant integrations
- 🔔 Creating the automated notification
- 📝 Conclusion
👋 Introduction
Starting my journey with Home Assistant on my new Synology DS220+, I quickly encountered an annoyance. While my NAS notifies me via E-Mail about new updates which can't be automatically installed, Home Assistant Updates will just appear and I won't recognize it, until I open the Dashboard. And still having the default view, it's not that obvious if the system is outdated. I'm running Home Assistant as a Docker container, so I have to manually update it (using docker-compose) to the latest stable version.
So I checked if all needed information was available in the state of Home Assistant and if there was an Telegram integration. Luckily nearly everything was already available so I could quickly dive into implementing an automation for this task.
⚙️ Requirements
According to the current state (Home Assistant Version 2021.12.10) there is no UI for setting up the Telegram integration. So make sure to have access to the configuration files of Home Assistant. How to gain access won't be covered in this post.
To register a Telegram bot and receive messages, you will of course need a Telegram account.
🤖 Setting up a Telegram bot
The Home Assistant documentation on the Telegram and Telegram Bot integrations was a bit confusing at first, so I will try to quickly summarize the steps needed to setup everything needed for this automation. For further reference there's also Telegram's Bot Documentation.
Create a new bot
These steps will create a new bot via Telegram using the @BotFather
- Start a chat with BotFather
- Run command
/newbot - Send a display name like
Home Assistant(This doesn't need to be unique) - Send an username like
FoosHABot(This needs to be unique and has some limitations, see the Documentation) - Your bot has now been created, make sure to write down the API Token to a secure place, as we will need it later on
Sidenote: After creating your bot, you can further configure your bot, e.g. assign a profile picture using
/setuserpic
Retrieve a chat id
These steps will retrieve your chat id (Using the @getidsbot)
- Start a chat with your bot and send at least one message to him, the content doesn't matter
- Then start a chat with GetIDs Bot using
/startas message - The bot will answer you with a greeting and some information
- Write down the value of
id, this is the chat id and we will need later on
Pro Tip: you can click the number and it will be copied to your clipboard
So now that you have successfully created your bot and wrote down both the API Token as well as the chat id we can start configuring Home Assistant.
🔗 Setting up the Home Assistant integrations
We need to configure multiple integrations, so that the automation will work.
Configuring the Telegram bot integration
To communicate through the bot, we need to add the following lines to the configuration.yaml:
1# Telegram bot2telegram_bot:3 - platform: polling4 api_key: !secret telegram_bot_api_key5 allowed_chat_ids: !secret telegram_bot_chat_idsAs you can see, the configuration is fairly simple. I'm also using secrets to easily exclude them from my Git repository to keep them private. I will provide a brief explanation for each configuration key.
telegram_bot- This is the integration's nameplatform- This is how Home Assistant will interact with the Telegram botapi_key- This is the API Token from the step Create a new botallowed_chat_ids- This is a list of chat ids which the bot is allowed to talk to. Use the chat id from the step Retrieve a chat id
A sample secrets.yaml with placeholders would look like this:
1telegram_bot_api_key: "{YOUR_API_KEY}"2telegram_bot_chat_ids:3 - {YOUR_CHAT_ID}4 - {ANOTHER_CHAT_ID}5telegram_bot_my_chat_id: {YOUR_CHAT_ID}Configuring a notification channel
To send a notification the easy way, Home Assistant's Notifications integration can be used. We will add a simple Telegram notification channel for our chat id retrieved in Retrieve a chat id:
1# Notification Channels2notify:3 - platform: telegram4 name: telegram5 chat_id: !secret telegram_bot_my_chat_idThat's it. Now we can trigger a notification using the notify.telegram service. The service name is always notify.{name}, so you can even use something like foos_telegram as name and call it via notify.foos_telegram.
Sidenote: A chat id could even be from a group, so the bot would send a message to that group instead to a single user chat.
To try your newly configured notification channel, head over to the Developer Tools > Services and select notify.telegram. Then add a sample message and click Call Service. Shortly after that you will receive a message from your bot.
Adding a sensor for the current version
Now that everything is set up to send a message using the Telegram notifier, only one thing is missing. An information which Home Assistant version is currently running. So we add the version integration.
UPDATE (February 3, 2022): Since Home Assistant 2022.2.0 you can (and should) set this up via the UI. Keeping the manual instructions for reference.
Adding the sensor to the configuration.yaml manually:
1# Sensors2sensor:3 - platform: versionThat's everything needed. By default this will check the current version of your Home Assistant instance and offer it in the state sensor.current_version.
🔔 Creating the automated notification
As I used the UI to create this automation, so I will describe what you should select or type to get the same result.
- General
- Use a meaningful name e.g.
Notify on HA Update - I decided to use the
ModeQueued(More information)
- Use a meaningful name e.g.
- Triggers
Trigger typewould beStateEntity=binary_sensor.updaterAttribute=Newest version
- Actions
- Here we have to use the yaml editor and insert the following
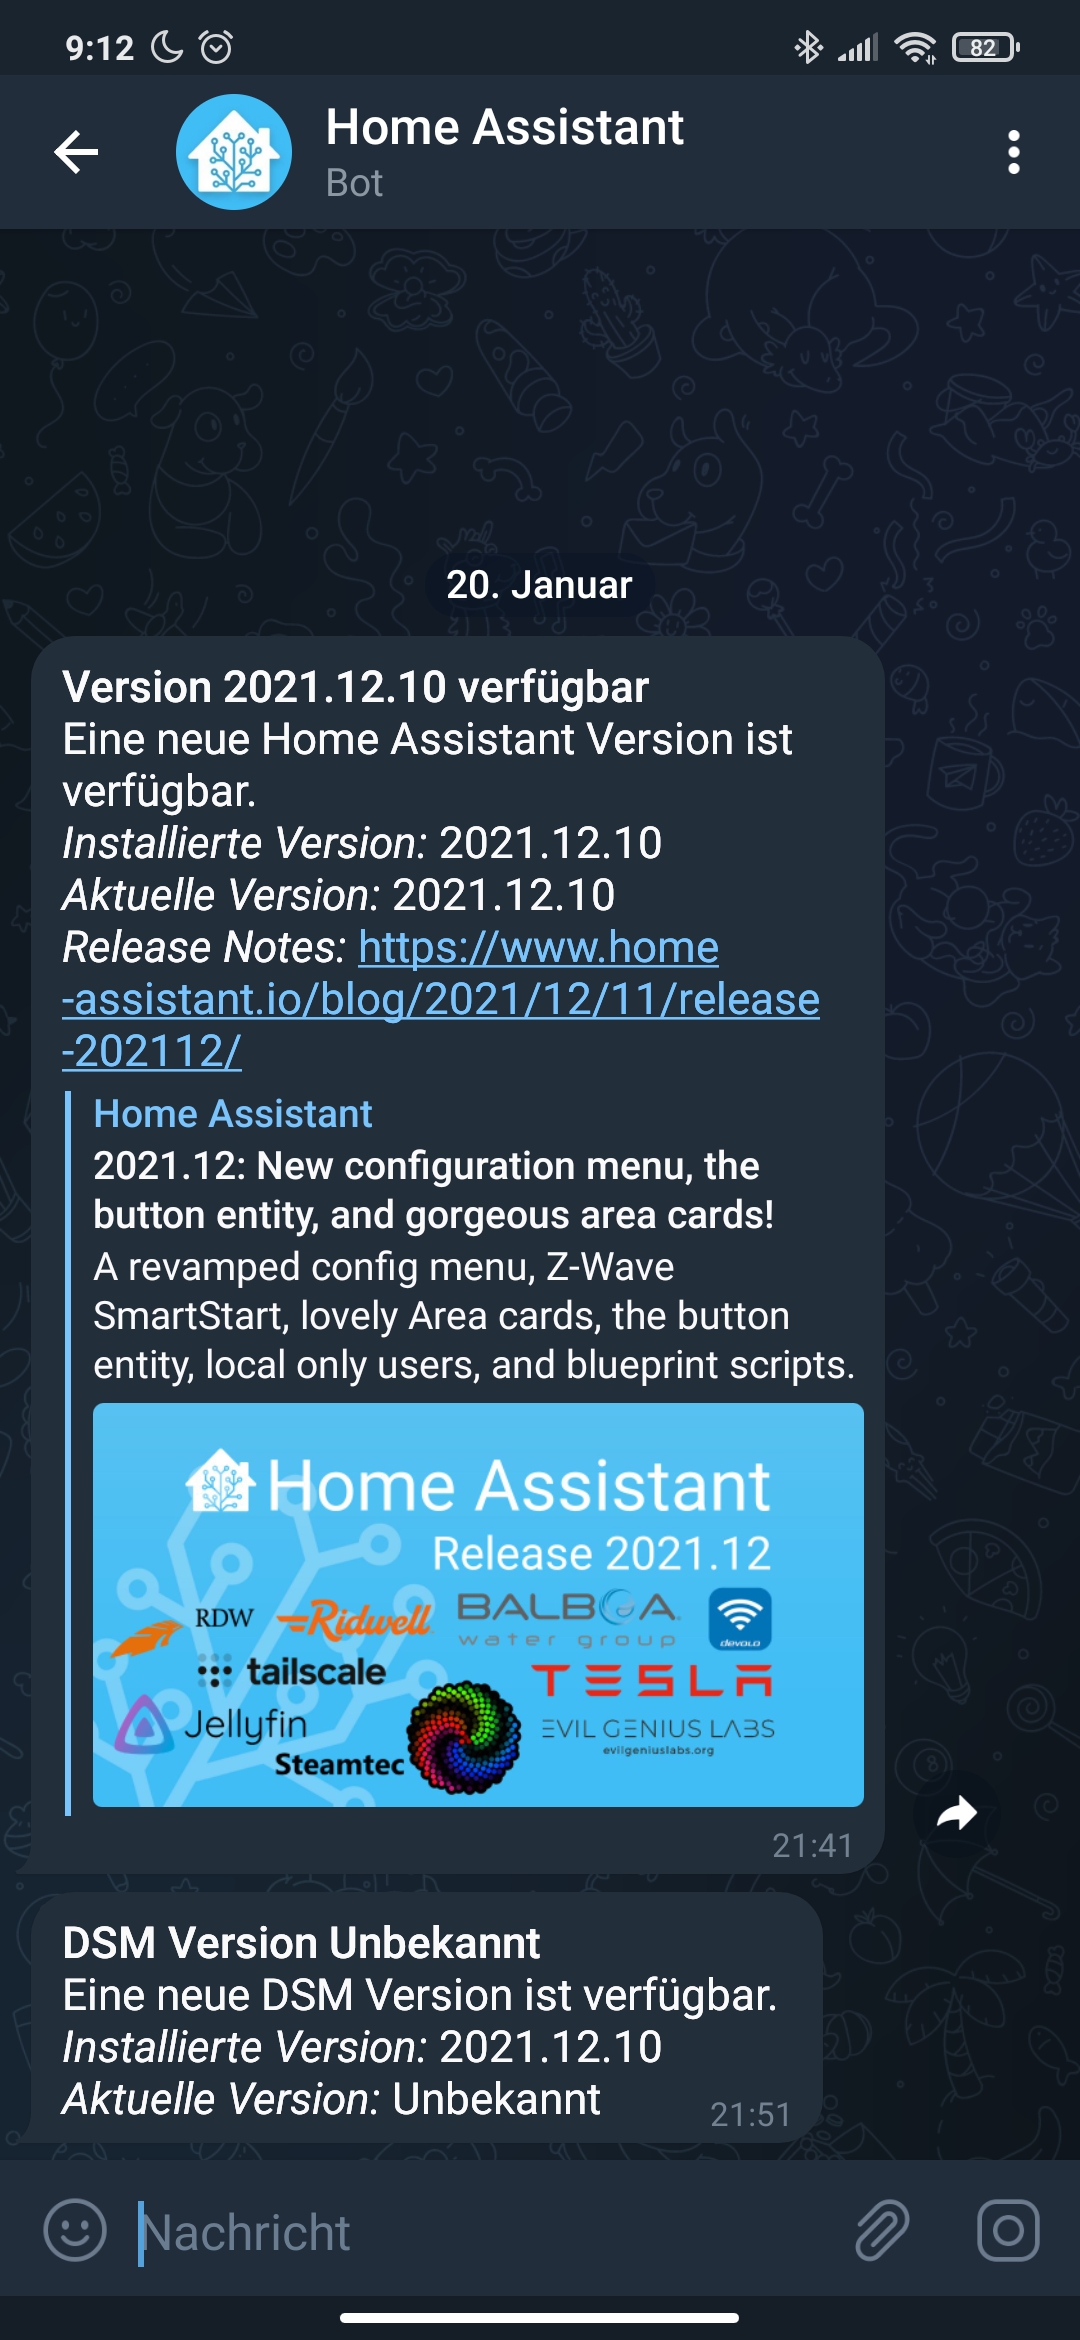
1service: notify.telegram 2data: 3 title: '*HA version {{ state_attr(''binary_sensor.updater'', ''newest_version'') }}*' 4 message: >- 5 A new Home Assistant version is available. 6 7 _Installed Version:_ {{ states('sensor.current_version') }} 8 9 _Newest Version:_ {{ state_attr('binary_sensor.updater', 'newest_version')10 }}11 12 _Release Notes:_ {{ state_attr('binary_sensor.updater', 'release_notes') }}Now hit the save button and execute the automation using Run Actions. If everything is configured correctly, you will now receive a notification from your bot.
Template for Synology DSM update notification
Prerequisite is, that you configured the Synology DSM integration.
- General
- Use a meaningful name e.g.
Notify on NAS Update - I decided to use the
ModeQueued(More information)
- Use a meaningful name e.g.
- Triggers
Trigger typewould beStateEntity=binary_sensor.nas_update_availableAttribute=Latest available version
- Actions
- Here we have to use the yaml editor and insert the following
1service: notify.telegram 2data: 3 title: >- 4 *DSM Version {% if state_attr('binary_sensor.nas_update_available', 5 'latest_available_version') == None %}Unknown{% else %}{{ 6 state_attr('binary_sensor.nas_update_available', 'latest_available_version') 7 }}{% endif %}* 8 message: >- 9 A new DSM Version is available.10 11 _Installed Version:_ {{ state_attr('binary_sensor.nas_update_available',12 'installed_version') }}13 14 _Newest Version:_ {% if state_attr('binary_sensor.nas_update_available',15 'latest_available_version') == None %}Unknown{% else %}{{16 state_attr('binary_sensor.nas_update_available', 'latest_available_version')17 }}{% endif %}📝 Conclusion
As you can see, using the different integrations from Home Assistant and setting up one or more Telegram notifiers, you can easily add further automated notifications. There are so many possibilities, as the Telegram integration allows things like Sending a Photo, Sending a Video, showing buttons to interact with your bot and trigger actions in home assistant when receiving events like telegram_command (See Telegram bot integration).
Maybe I will find the time to dive deeper into it and write another post.
Until then, hit me up on Twitter @theiNaD with your questions or feedback.